
Git Module Documentation
Download the module
Please click here  to download version 1.0.0 of the Git module.
It is an open source project, click here to access the repo !
What's the Git module ?
The Git module is an Ignition module embedding a Git client to make its integration easier into Ignition project development.
It permits to manage project resources throughout the development process in the Ignition designer.
Exporting gateway configuration is simplified or even automated.
Here is a non-exhaustive list of features :
- Link an Ignition project with a remote repo, (Gateway Webpage)
- Link an Ignition user to a git project, with ssh or user/password authentication, (Gateway Webpage)
- Commit resources, (Designer, on project saved or from git toolbar)
- Push & Pull resources, (Designer, from git toolbar)
- Export of the gateway configuration. Tags, images, theme... (Designer, from git toolbar)
Link an Ignition project to a remote repo
In order to link an Ignition project to a remote repo, you must :
- Go to the page Config - Git - Projects of your Ignition gateway,
- Click on "Create new Project",
- You can select the Ignition project,
- Then fill in the URI of your git repository,
- And click on "Create New Project" to save the association.
If the URI starts with "http" the authentication method will automatically be in user/password otherwise it will be in ssh.
The git repository will clone itself into the Ignition project folder when it is first opened in the designer following the association..
We therefore advise you to start from a blank repo and to configure a user before opening the designer.
For all other cases, you can configure your git repo manually, via command line, but this requires installing git on your machine.
Generate SSH key
To generate an SSH key you can run the following command line :
The private key is generated in your ssh key user folder.
SSH Folder :
Windows : C:\Users\YourUser\.ssh
Unix : /Users/YourUser/.ssh
It takes by default the name "id_rsa".
The content of the "id_rsa.pub" file will be added in the SSH Keys of your git account.
While the content of the file "id_rsa" will be added to your Ignition Git user.
Link an Ignition user with a Git repo
In order to link an Ignition user to a Git repo, you must :- Go to the page Config - Git - Projects of your Ignition gateway,
- Click on the "More" button of the associated project, then "manage users",
- Click on "Create new User",
- Fill in the Igniton user name of the user source associated with your project,
- For SSH authentication repo :
- Paste the ssh key associated with your git user,
- For User/Password authentication repo :
- Fill in the git user's username,
- Fill in the git user's password twice,
- Click on "Create New User" to save the association.
Pull changes
You can retrieve the changes made on the remote repo of your current branch with the pull command.
You can trigger a pull by clicking on the  in the git toolbar of your designer.
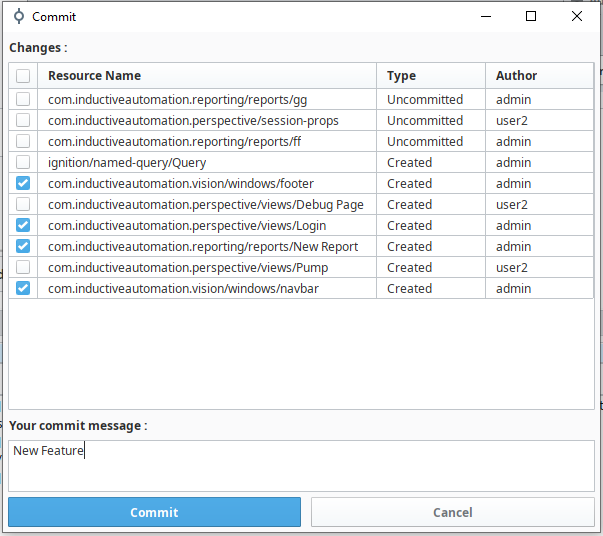
Commit changes
You can record changes to the repository with the commit command.
You can trigger a commit by saving your project or clicking on the  in the git toolbar of your designer.
A commit popup will appear, in which you have to select the files you want record and write a message describing the change you have just made.
Push commits
You can send all commited changes of your current branch to the remote repository with the push command.
You can trigger a push by clicking on the  in the git toolbar of your designer.
Export gateway configuration
You can export gateway configuration to your project folder.
You can trigger it by clicking on the  in the git toolbar of your designer.
The exported data are :
- A "tags" folder containing one file per tag provider, each file contains the configuration and the value of the tags,
- An "images" folder containing the images of the gateway,
- A "themes" folder containing the perspective theme used by the project.

Changelog
- 1.0.0 :
- first release